PetSafe Stay & Play Setup, Step by Step
To set up a PetSafe Stay & Play wireless fence, place the indoor transmitter, set its circular range, mark the boundary, and train your dog with the receiver collar. Follow the model manual for exact controls and training steps.
On this page (7 sections)
- What do you need before PetSafe Stay & Play setup?
- Where should you place the transmitter?
- How do you set the circular boundary?
- How should the receiver collar fit?
- How do you train a dog to use the boundary?
- What should you check if the signal does not match the flags?
- How do you finish PetSafe Stay & Play setup?
To set up a PetSafe Stay & Play wireless fence, place the transmitter indoors, set its circular range, mark the boundary, fit the receiver collar, and train your dog. The system uses a circular signal around the transmitter, so check how that shape fits your yard before you begin.
PetSafe describes setup as taking as little as 1–2 hours, though the full process includes more than turning on the transmitter. Read the manual for your model first, then work through placement, boundary checks, collar fit, and training in order.
What do you need before PetSafe Stay & Play setup?
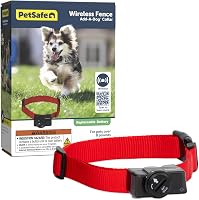
You need the transmitter, its power adapter, receiver collar, charger, and manual before starting. The compact system also includes training flags, a test light tool, contact points, and a contact point wrench.
The stubborn-dog system includes training flags, a test light tool, short and long contact points, and a wrench. Check the contents against the manual so you know which parts came with your specific kit.
Pick a time when you can supervise your dog throughout setup and training. Keep your dog inside or on a leash while you check the boundary, since the signal is not a physical barrier.
Where should you place the transmitter?
Place the transmitter indoors, near an outlet, where its circular signal can cover the area you want. The adjustable boundary extends outward in all directions from that point.
The compact and stubborn-dog models describe a range of 22–105 ft in all directions, up to 3/4 acre. Since the boundary is circular, a corner or long narrow yard may leave parts of the space outside the useful play area.
Use the placement instructions in your model's manual. Once the transmitter is on, walk around the yard with the receiver collar and test the signal at several points before bringing your dog outside.
If you're still weighing a radio boundary against another approach, read how GPS and wireless dog fences differ. For a broader look at how radio systems work, see our guide to radio wireless dog fences.
Which PetSafe Stay & Play system suits the setup?
The compact wireless fence is a fit if you want the standard Stay & Play system with an LCD display showing how far the play area expands and warning indicators for system errors.
The system supports one included collar and additional collars for more pets. It is portable for places such as a campsite or vacation home where you have access to an outlet.
Choose the stubborn-dog version if you want a tone-only mode and 5 static correction levels as part of the collar system. Those settings give you options to adjust during training, but the manual's procedure should guide how you use them.
Both systems use a circular boundary, so neither changes the yard shape. See wireless fence options for different yards and dogs if you need to compare system types or yard fit.
How do you set the circular boundary?
Set the circular range with the transmitter controls, then use the receiver collar to check where the warning area begins. Make small adjustments and walk the full edge rather than estimating the boundary from one spot.
The compact model has an LCD that shows how far the play area expands and gives warning indicators if there is a system error. The stubborn-dog model's setup controls and indicators may differ, so follow its own manual.
Mark the tested edge with the included flags. Place them where your dog can see the line clearly, keeping the spacing and placement consistent with the instructions.
How do you test the boundary before training?
Use the supplied test light tool and collar as directed by the manual. Walk the yard perimeter slowly and confirm the warning signal occurs where expected.
Check near the house, driveway, and any area where you want your dog to play. If the boundary reaches places you don't want, reposition the transmitter or adjust its range, then test again.
If the signal behaves unpredictably, pause and review the manual's troubleshooting steps. Our guide to PetSafe wireless fence problems covers common checks.
How should the receiver collar fit?
Fit the receiver so it sits securely on your dog's neck, using the contact points and collar adjustment described in the manual. The included receiver collars fit dogs weighing 5 lb and up and neck sizes of 6–28 in.
The collars are rechargeable and waterproof. Check the fit regularly, especially if your dog's coat or neck size changes, and remove the collar when training is not in progress as directed by PetSafe.
The stubborn-dog kit includes short and long contact points for different coat lengths. Select the correct set using the manual's instructions rather than guessing.
The rechargeable collar sold separately works with PetSafe wireless fence transmitters, but it is not compatible with PetSafe in-ground fences or remote trainers.
Its battery charges in 2–3 hours, and each charge lasts up to 3 weeks depending on use. A low-battery indicator signals when it is time to recharge.
For battery care and replacement questions, see PetSafe wireless collar battery guidance.
How do you train a dog to use the boundary?
Introduce the boundary gradually and follow the training schedule in the manual. Use the flags and collar cues to teach where the play area ends, and keep your dog supervised during each session.
Start with short, calm practice sessions. Guide your dog back toward the play area when the warning cue begins, and reward returning to the safe area in a way that suits your dog's training.
Don't rely on the system to contain a dog who has not learned the boundary. Keep gates and doors secured, and use a leash or physical fence when you cannot supervise training.
For a general sequence that applies across wireless systems, read how to set up a wireless dog fence. The transmitter, collar, and boundary details can vary by model, so use the Stay & Play manual for its specific steps.
What should you check if the signal does not match the flags?
If the warning area doesn't line up with the flags, recheck transmitter placement, range settings, collar charge, and the manual's test procedure. Don't start training until the signal is consistent around the intended play area.
Look at the transmitter display and warning indicators if your model has them. Confirm the receiver collar is powered and charged, then test the perimeter again with the tool and method specified in the manual.
A circular wireless boundary may not suit every yard. Read about wireless dog fence range to understand why coverage shape and distance matter when choosing where to place the transmitter.
How do you finish PetSafe Stay & Play setup?
A PetSafe Stay & Play setup is ready for training when the transmitter is placed, the circular boundary is tested and marked, the collar fits, and you have the model manual nearby. Continue supervising your dog as it learns the boundary.
Choose the compact system if the LCD range display and warning indicators match your needs. Choose the stubborn-dog system if you want its tone-only mode and 5 correction levels, and add a rechargeable collar if you need another receiver for a PetSafe wireless fence.
For setup across other wireless fence types, continue with our step-by-step wireless dog fence setup guide.
Frequently asked questions
How long does PetSafe Stay & Play setup take?
PetSafe describes setup as taking as little as 1–2 hours, and the compact system's features also describe setup in a few hours. Allow extra time to read the manual, choose a transmitter location, mark the boundary, fit the collar, and work through training.
Follow the instructions for your exact model.
Where should I place the PetSafe Stay & Play transmitter?
Place the transmitter indoors and plug it into an outlet, following the manual's location guidance. The system creates a circular boundary around the transmitter, so choose a position that gives your dog a useful play area and check the signal around the yard before relying on it.
Is the PetSafe Stay & Play boundary circular?
Yes. The Stay & Play wireless fence creates a circular boundary around the indoor transmitter, with an adjustable range up to 3/4 acre for the compact and stubborn-dog systems.
A circle may not match a long or sharply shaped yard, so check the fit before training.
Can I add another collar to PetSafe Stay & Play?
Yes, the Stay & Play system can use additional compatible PetSafe wireless fence collars. The rechargeable Stay & Play collar works with PetSafe wireless fence transmitters, but not with PetSafe in-ground fences or remote trainers.
Check the model manual before adding a collar.